Overview
This article details the tools and techniques to maximize the accessibility of any PDFs you create. PDF accessibility testing and remediation can be a labor-intensive process; to make it easier, consider the following approaches before beginning work on any PDFs:
Before working on a PDF:
- Familiarize yourself with the guidelines in the accessible documents overview article. Those rules apply to all documents, including PDFs.
- If you are starting with a scan of a journal or other physical media, review the Scanned PDF and Optical Character Recognition article.
- If you are starting with a file that you exported from Microsoft Word or other content editing interface, go back to that source document and make as many accessibility tweaks as possible, then re-export the document to PDF. If you make accessibility fixes directly to the PDF, then go back to the source document to make content changes, and re-export the PDF, you'll need to make those PDF accessibility changes all over again.
- SAVE OFTEN. Some steps in Adobe Acrobat cannot be undone.
Setting up Acrobat
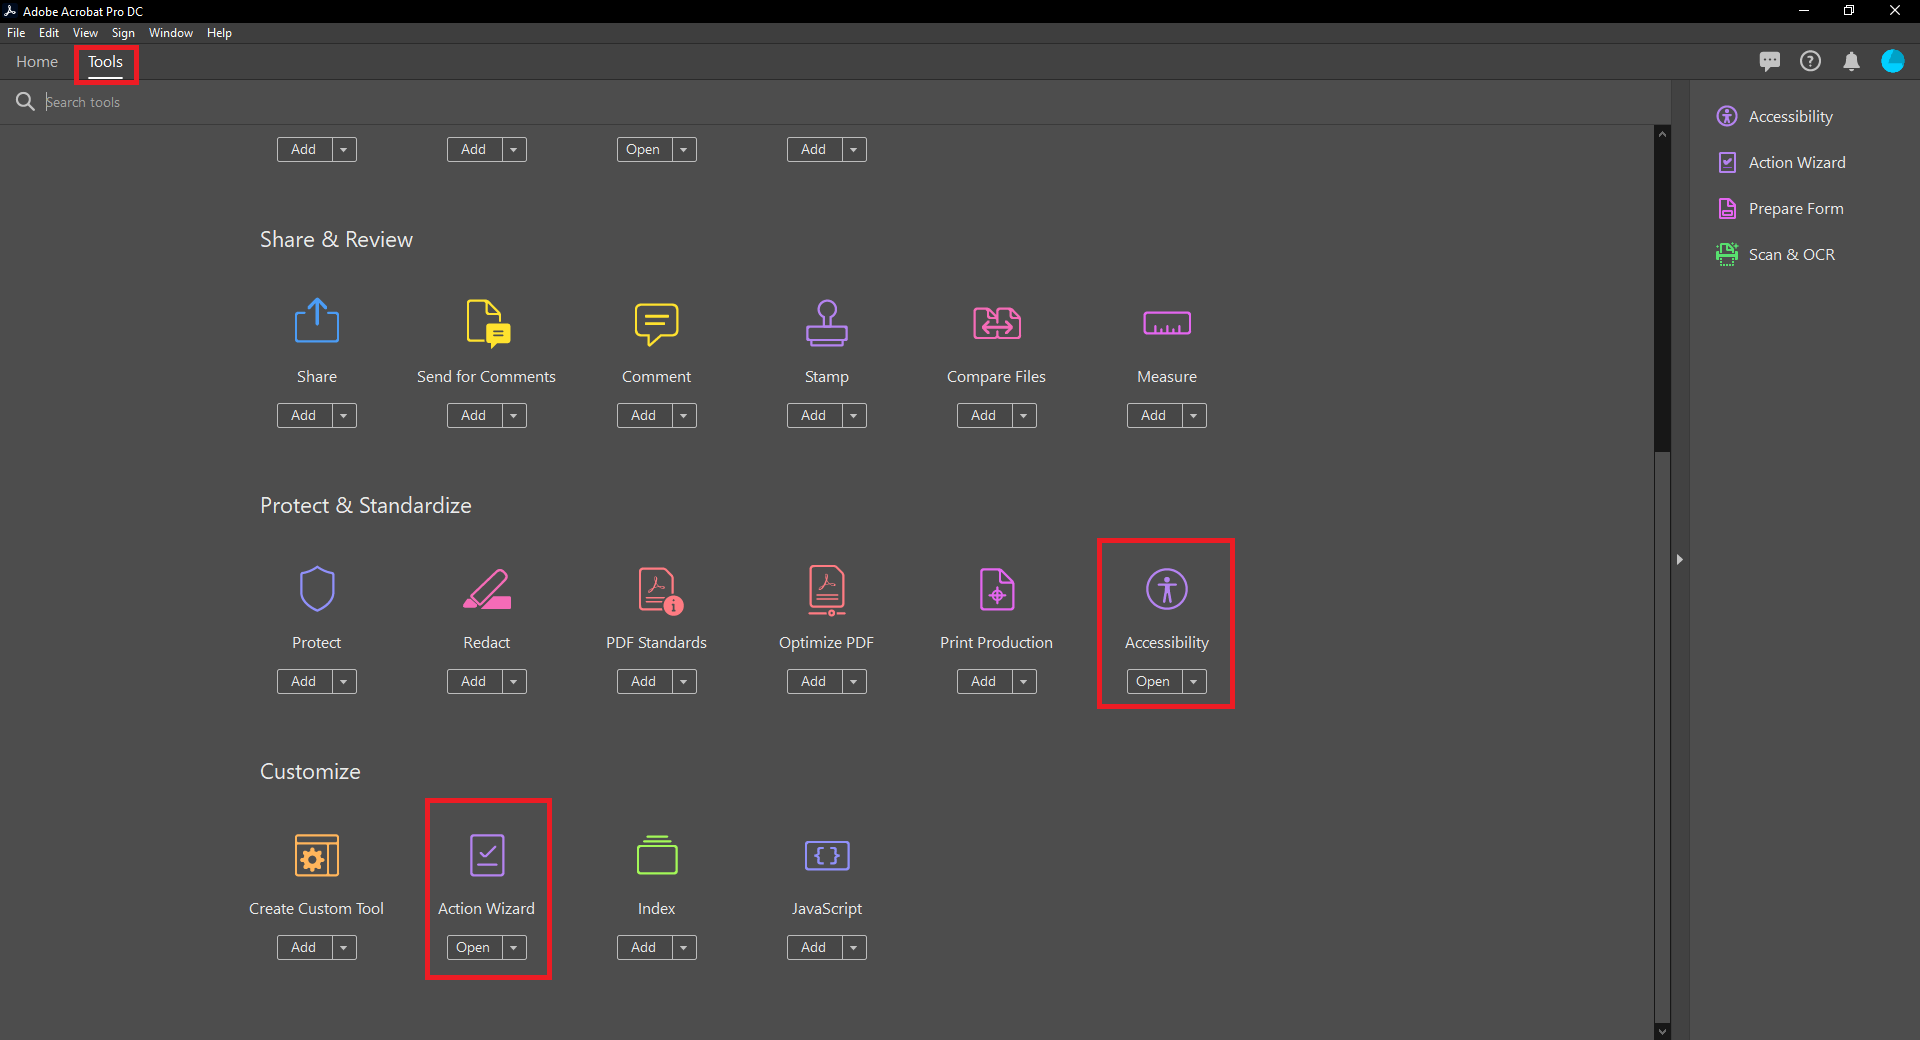
- Add the Accessibility and Action Wizard tools to the tools pane of Adobe Acrobat. Under the Tools tab, find Accessibility and Action Wizard. Click the "Add" button on each and it will be added to the Tools sidebar.
- You might also use the Scan & OCR tool and the Prepare Form tool in later accessibility testing steps, so add those tools while you are here. Once you add the tools to the sidebar, the Add button changes to Open, as seen in the screenshot.
Guidelines
Using Acrobat's Accessibility Tools
Acrobat has two ways of performing automated accessibility tests.
Check Accessibility
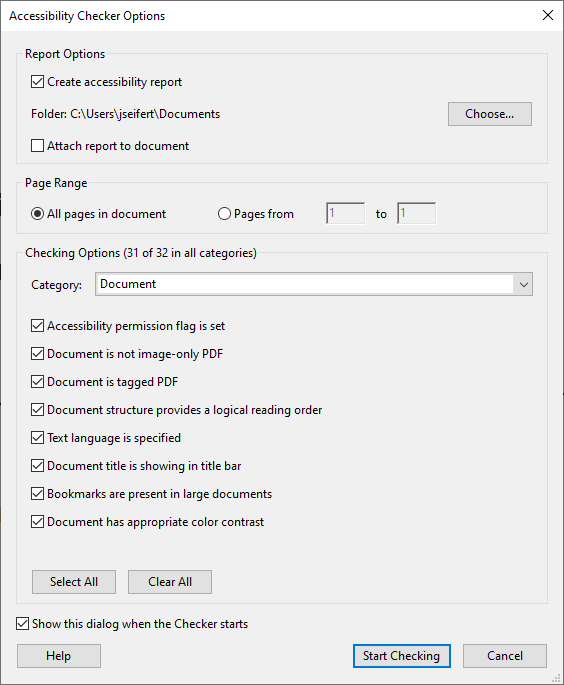
The Check Accessibility tool will perform a variety of tests to verify that most accessibility criteria are met. Under the Tools sidebar, select the Accessibility icon, then the Accessibility Check option. This will open up a dialog box where you can select which checks you want to perform. If you're unsure what to test, leave all the default options selected.
This will automatically generate a report that lists all the accessibility issues found on the document.
- Checks that pass will have a green check box.
- Checks that fail will be flagged with a red 'x'. You can right-click or ctrl-click on the item, opening up a dropdown menu with links that explain the issue in more detail, and that provide shortcuts to address the errors.
- Example: When exporting documents from Microsoft Word, the document title frequently does not transfer over, so you may be prompted to re-enter the document title.
- Checks that require manual review have a blue question mark icon. Some items, like a logical reading order, cannot be accurately assessed by an automated tool and require your attention. These are explained later in the article.
Make Accessible Wizard
The Make Accessible wizard will walk you through a number of steps needed to make your document accessible. Whereas the Check Accessibility tool will test your document and present a report at the end describing what needs to be fixed and/or reviewed, the Make Accessible wizard actually opens up all the relevant dialog and settings boxes and asks you to review and revise them one at a time, so that by the time you're done, the document is (almost) accessible.
Save an alternate copy of your document before running this tool.
The Make Accessible wizard runs through the following options:
- Review document description (Title, Author, etc.)
- Recognize Text using OCR (See note following this list)
- Identify Form Fields
- Set Language
- Check for Images with Missing Alternate Text
- Run full Accessibility Check
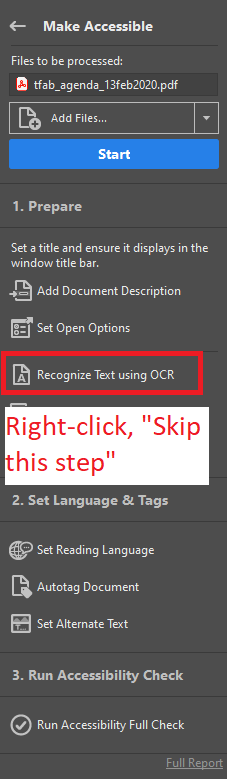
One step in the Make Accessible wizard is to recognize text using Optical Character Recognition. If you don't have searchable and selectable text on your document, like an image scan of a journal article, you want to perform this step. If you do already have searchable text, the autogenerated output from Acrobat probably won't be as good as what you currently have. When you select the Make Accessible tool, before clicking the blue "Start" button, right-click the "Recognize Text using OCR" button and select "Skip this step".
Check Accessibility vs. Make Accessible: Which is better?
Using Check Accessibility or Make Accessible is largely a matter of preference; Make Accessible requires you to click through a few options that you could otherwise avoid (like document language, assuming your document is all in English), but this is a trivial effort, and it also helps make sure you don't miss any steps you might overlook with the Check Accessibility tool. Also note that running the Check Accessibility tool is the final step of the Make Accessible wizard, so if you use the wizard, you don't need to run the Check Accessibility tool separately.
Tags and Reading Order
PDF Tags are data that surround all the content on your document. It isn't visible on-screen, but tells assistive technologies how the content is structured and ordered. It's similar to the HTML that defines the layout of websites.
There are 37 different tags available in Acrobat, but not all of them are frequently used. Most common are <P> paragraph tags, used for standard text content, <H1> through <H6> heading tags, to indicate different tiers of headings, and <L> list tags. The best way to create tags is to use correctly structured data in your source document. If you use the defined Heading and List elements in Microsoft Word before exporting it to a PDF, then the tags will already be correct. More complex tags for tables and forms will be discussed in a separate article on advanced PDF remediation techniques.
Click the Tags pane in the left toolbar, and it will show the tag structure of the document. Clicking through each element in the tags tree (list of tags) will highlight the different elements on the page, as seen in the purple box on the screenshot. This is the order that different document elements are read by screen readers, so verify that tags are presented in a logical order. If they are not, you can reorder them either by dragging and dropping them on the content tree, or by right-clicking on incorrectly positioned items, cutting them, then pasting them where they belong in the tags hierarchy.
This screenshot shows a mostly correct tag structure. There are a few stray tags at the top, which will be removed. Everything else looks correct. The H1 in this screenshot is the primary heading of the document. There is a paragraph (standard) text below that, then an H2 subheading, then several paragraphs beneath it.

Revising Tags
There are a couple ways of modifying tags. You can right-click on any incorrect tags, select Properties, then choose the correct tag from a dropdown list in a dialog box. This gives you every possible tag option, at a granular level of control. If you have a document with a simple structure, an easier way of revising the tags is with the Reading Order tool.
Reading Order Tool
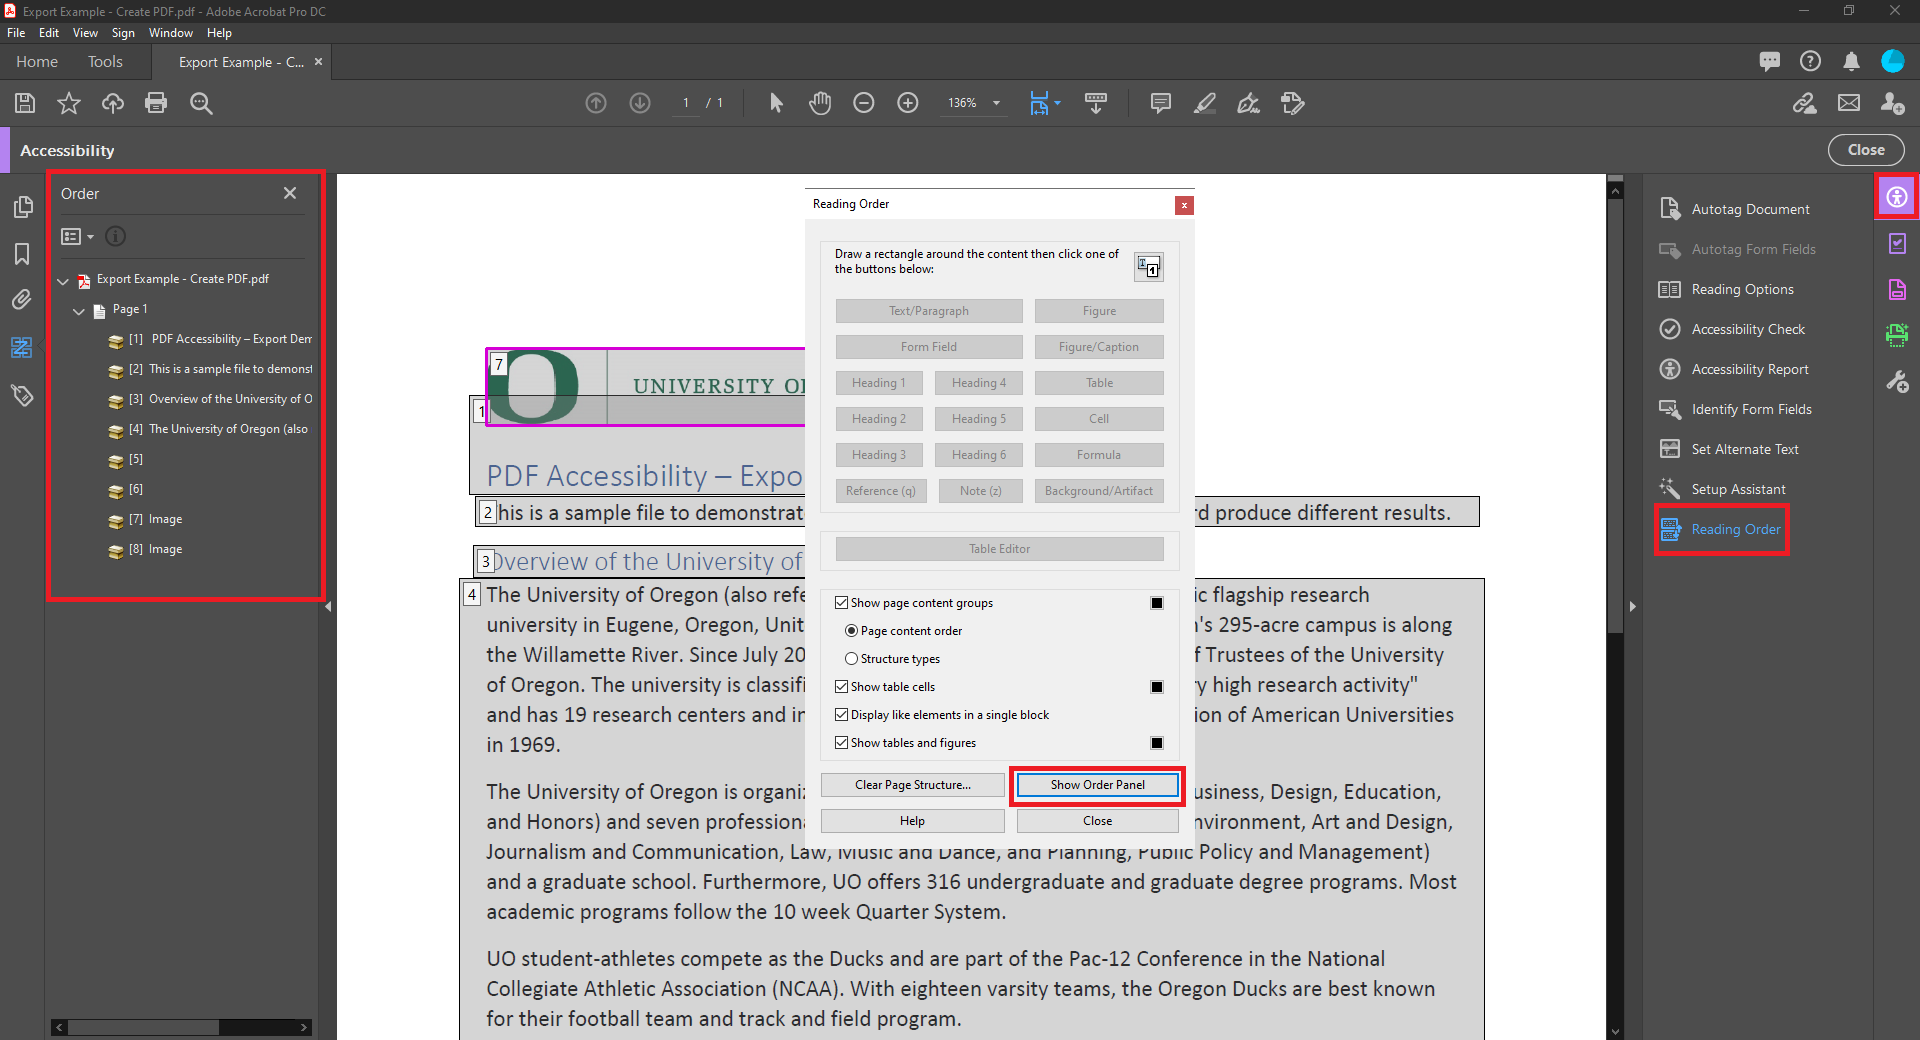
Under the Accessibility tool, select the Reading Order option. This brings up a dialog box prompting you to select different elements on the page. It also wraps all the content on the PDF in grey boxes, each representing a separate set of PDF tags.
To change the tags, use your cursor to draw a rectangle around some of the content on this page, then select how that content should be re-tagged. Recall in the previous image that the University of Oregon logo was incorrectly wrapped in <P> paragraph tags. Highlighting the logo, then clicking on the "Figure" button will correctly re-tag it as an image.
The Reading Order tool also has two other important uses:
- Revise the reading order. If you click "Show Order Panel" on the dialog box, it opens up a sidebar on the left side of Acrobat, as seen in the above screenshot. There are some minor technical nuances between the Tags order and the Reading order, but generally they should represent a logical left -> right, top-> bottom order. Each grey box has a number on it, representing the order in which it gets read. The UO logo is numbered 7th on the page. This is incorrect, it should be read first. Drag-and-drop the list items on the Reading Order panel so they are correct.
- The Reading Order tool is also good for flagging Artifacts. Artifacts are "junk tags", the remains of stray formatting changes that you want Acrobat to forget about, and screen readers to ignore. If you use the Enter key when creating documents in MS Word to add extra whitespace, those will insert extra empty <P> tags in your PDF. Highlight these and flag them as Artifacts, and they get removed from the tag tree.
Additional Resources
This article describes the basics of PDF testing and remediation. If you work with PDFs regularly, or if you handle PDFs with forms, tables, and more complicated structure, there are a variety of resources that go in-depth on these advanced topics.
- UO Guide on Accessible PDF Forms
- UO Guide on Accessible PDF Tables
- WebAIM Resources on accessible PDFs
- Adobe references on accessibility tools