Overview
If you have tables in your PDFs, they require special formatting to be made accessible. Even if you format your tables correctly in Microsoft Word or other source document, certain table information does not get exported correctly to PDFs. This document explains how to format your tables, both within the source document and within Acrobat, to maximize accessibility.
This article refers extensively to example tables. You can download and follow along with the sample files used in this guide:
Starting PDF with inaccessible tables
Finished PDF with accessible tables
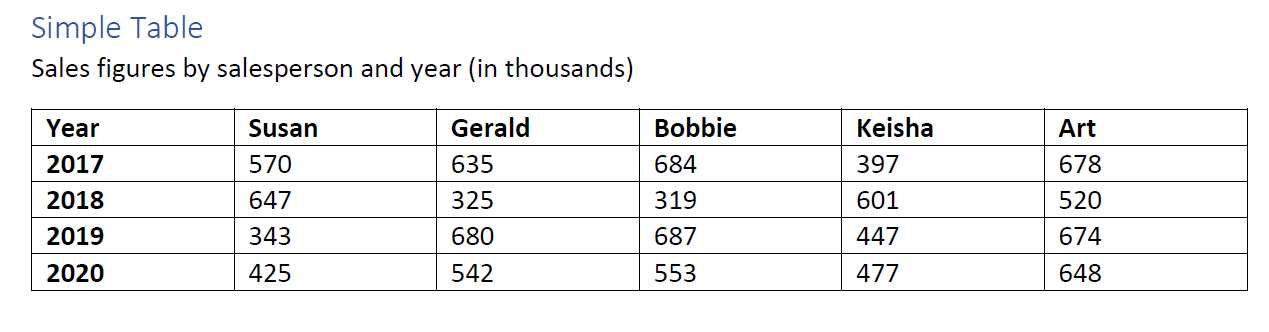
Simples vs. Complex Tables
The best way to maximize accessibility of your PDFs is to use simple tables. Avoid using complex tables. "Complex" doesn't refer to the size of the table, nor the subject matter of the data in the table; it doesn't mean it's about rocket science. Instead, it means it has multiple tiers of headings (either column or row headings), or that it has merged header cells. Simple tables are those tables that do not have any of the aforementioned traits.
Using complex tables is strongly discouraged. The fundamental approach towards accessible tables is taking data that is inherently non-linear, and attempting to linearize it, so that it can be more easily understood by people who use screen readers. Having multiple headers, and heaving headers that span multiple columns or multiple rows, makes the relationship between columns, rows, and data cells far less intuitive.

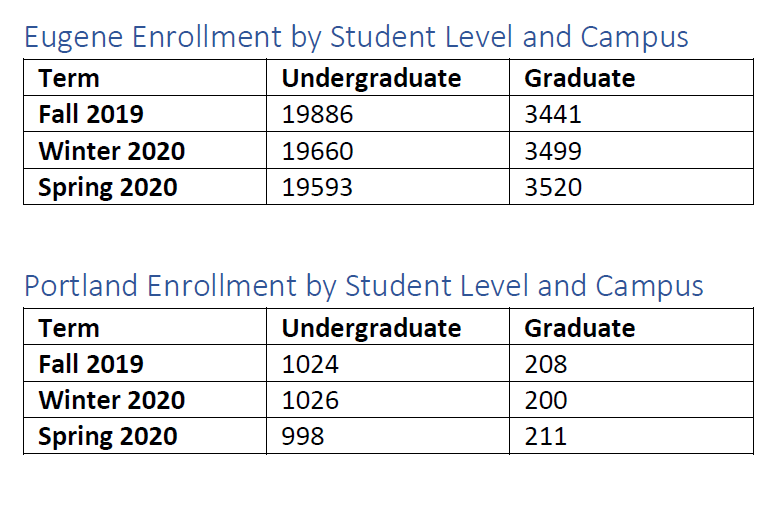
The easiest approach to handling complex tables is to break them down into one or more simple tables within your source document. Frequently, complex tables don't even need multiple nested headers, nor merged cells. These are often added solely for design purposes. As an example, the above Complex table could be divided by campus. Break the Eugene campus out into it's own simple table, with terms as the rows, and undergraduate/graduate as the columns. Identify that this data refers to the Eugene campus in the table title. Do the same thing for Portland campus. Now you have two simple tables, which are much easier to manage for accessibility, and are also easier to understand for sighted users.
Correcting Simple Tables
The main component to fixing simple tables is to make sure the correct cells are flagged as headers, and that they have their scope defined. "Scope" indicates if the headers are associated with rows, columns, or both. This is easy to tell visually, but for assistive technologies, we need to be explicit.
The tool to edit these tables is under the Accessibility tool in the sidebar. If you don’t have the Accessibility tool available here, just search for “accessibility” in the search box. Click on it, then choose the Reading Order tool.
Click anywhere on the table that you want to edit, then choose the Table Editor option from the dialog box.
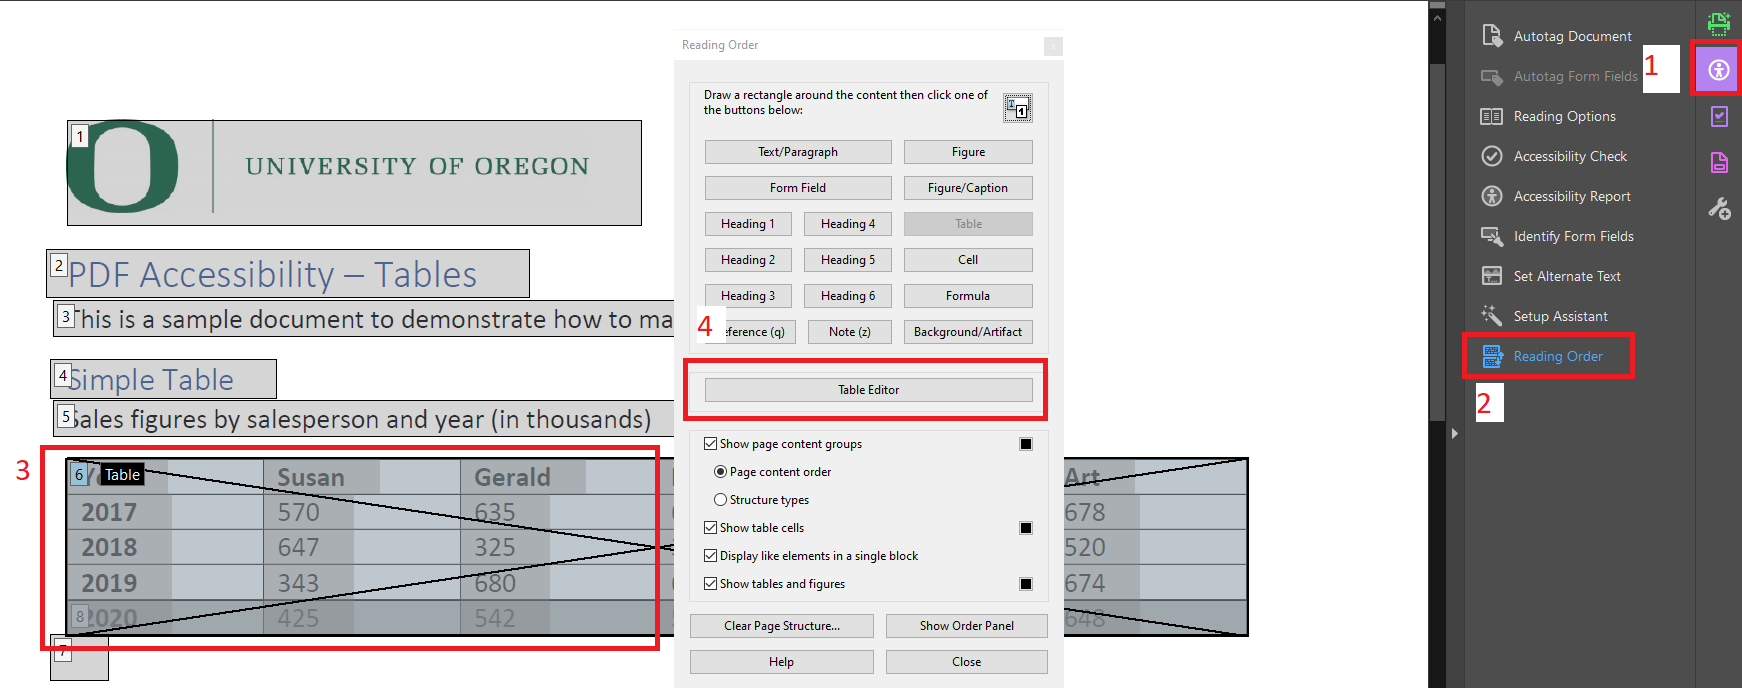
Now, choose the cell(s) you want to review. You can check them one at a time, or you can multi-select by holding down shift and clicking, or dragging a box around the relevant cells with your cursor. Here's where you define that the header cells are column or row headers, so don't choose a multi-selection that combines the two. Right-click (or ctrl-click on Mac) then choose Table Cell Properties
At this point, you may notice that some cells are red, and others grey. Acrobat colors headers with a red background, and data cells with a grey background, but this does not mean that the headers have their scope defined. You may also notice, as per these screenshots, that the box Acrobat draws around table cells doesn't always line up perfectly with the visual boundaries of the table. Don't worry about this.
With the Table Cell Properties dialog box open, you can define the cells as either Header or Data cells. If you formatted your table correctly in Word, these should already be headers, but if something went amiss, this is where you change it. The Scope dropdown is where you can define if your headers apply to columns or rows. Acrobat defaults to all headers having a scope of "None". In my example, I had multi-selected all the column headers, so I am defining the scope as "Column".
Click the OK button.
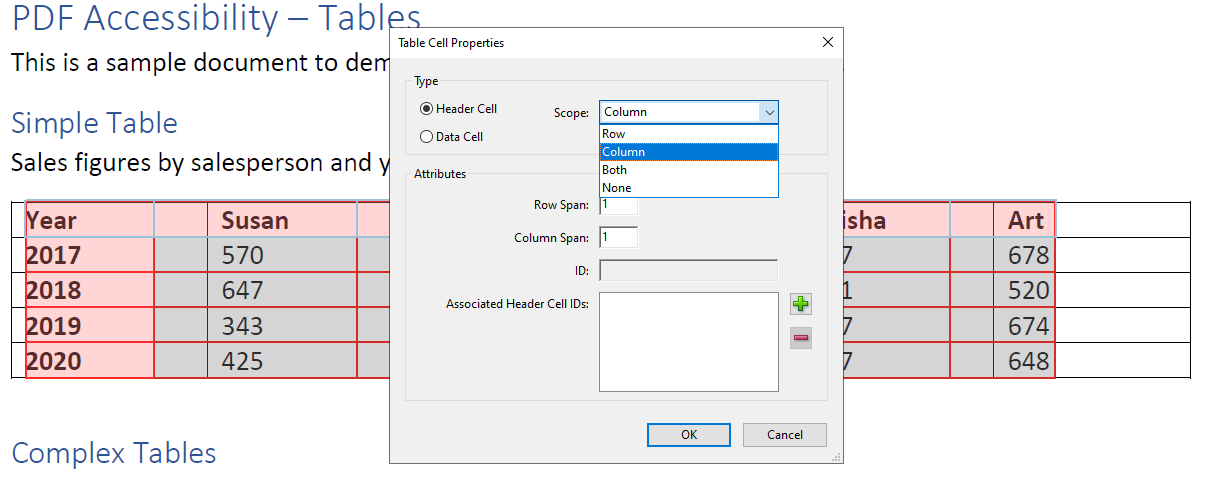
Do the same thing for the Row headers, and if you have a simple table, that's all you need to do to make it accessible.
Correcting Complex Tables
Complex tables require you to define the Scope, the same as simple tables, but have a few extra steps. For complex tables, you must:
- Identify the span of any merged cells
- Create IDs for any complex headers
- Associate every single data cell with certain Header IDs]
Assigning Merged Cell Spans
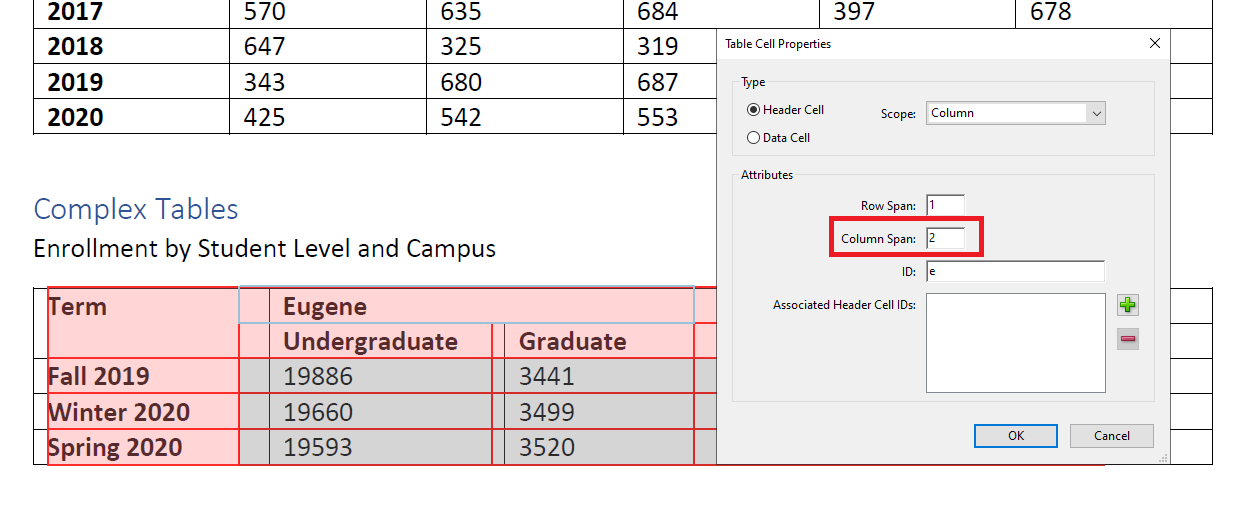
"Span" refers to how many columns or rows your header spans. Standard cells span one column and one row, but if your header uses merged cells, it will span multiple rows and/or multiple columns. In the complex table example, Eugene and Portland both span two columns. Right-click on Eugene, select Table Cell Properties, and in the same dialog box as you saw before, you can set the row and column span. Eugene spans 1 row and 2 columns, so change the Column Span value to 2. Also note, the Scope of this cell was defined as Column, as per the Simple table instructions. You may also note an ID of 'e', I will address this later.
Do the same thing for the Portland cell, as it also has a span of 2 columns.
Do the same thing for the Term cell, which is a column header, but it has a span of 1 column, and 2 rows.
Also worth noting, Word commonly does not do a good job of flagging nested headers correctly. The Undergraduate and Graduate nested headers should be marked as headers, but Word often only recognizes the very top row (or very first column) as headers, so you may need to manually flag nested headers appropriately.
Assigning Header Cell IDs
The next step is to set IDs for any complex headers. PDF Table IDs behave the same as HTML IDs, if you have familiarity with working on websites. They're just a way of labelling your header cells, so you can refer to them in your data cells. All complex headers need IDs - any merged headers, and any nested headers. In the complex table example, all the column headers are either merged or nested, so they all need IDs. The row headers are simple - neither merged cells nor having nested headers - so they do not need IDs.
The reason we need to add IDs is to explicitly tell assistive technology which data cells are associated with each header. We know Eugene spans two columns, but which two columns, exactly, does it span? We can see this visually, but we need to define it programmatically.
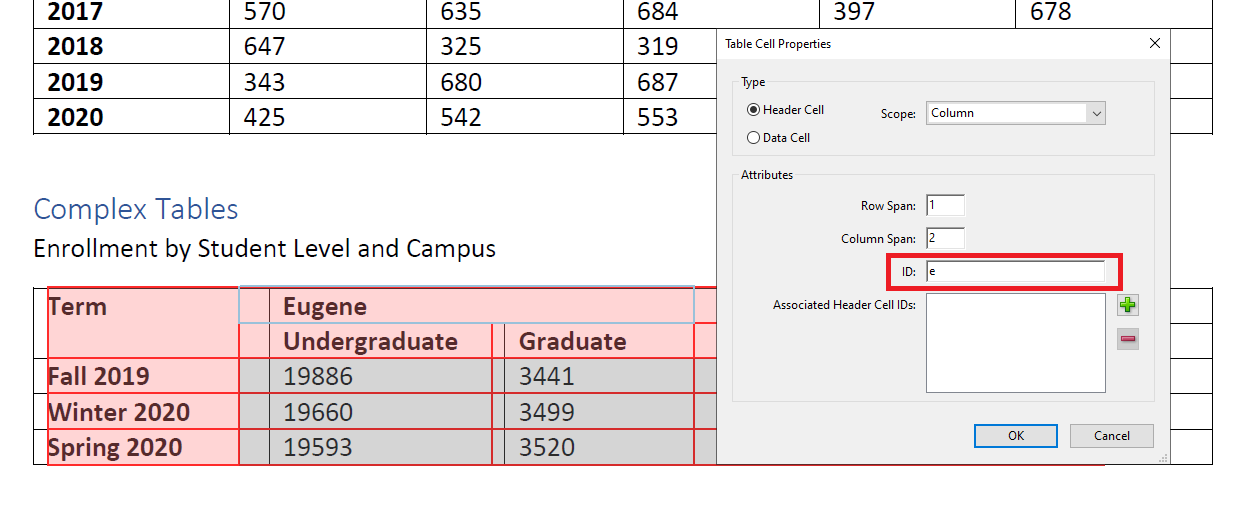
For each complex header (only single-select, do not multi-select here), right-click on the cell and select Table Cell Properties. In the ID field, add an ID. The ID can be anything, the only rules are that it be unique, and that it's logical to you, as you will reference it later on in the data cells. I gave the Eugene cell an ID of 'e'.
Go through every complex header cell and give it a unique ID. I gave the Portland cell an ID of 'p'. The Undergraduate header cell underneath Eugene received an ID of 'eu' (for Eugene undergraduate) and the remaining nested headers followed the same naming convention, Eugene graduate is 'eg', Portland undergraduate 'pu', and Portland graduate 'pg'.
Data Cell Association
The last step, and potentially the most time-consuming step, is to associate every data cell with these complex header IDs. Because some header cells span multiple rows and columns, because some header cells are nested, there is no non-visual way of telling the user that Data Cell A is associated with Header Cells X, Y, and Z. Adding these Associated Header Cell IDs creates this association.
Select a cell in the table, right-click and select Table Cell Properties.
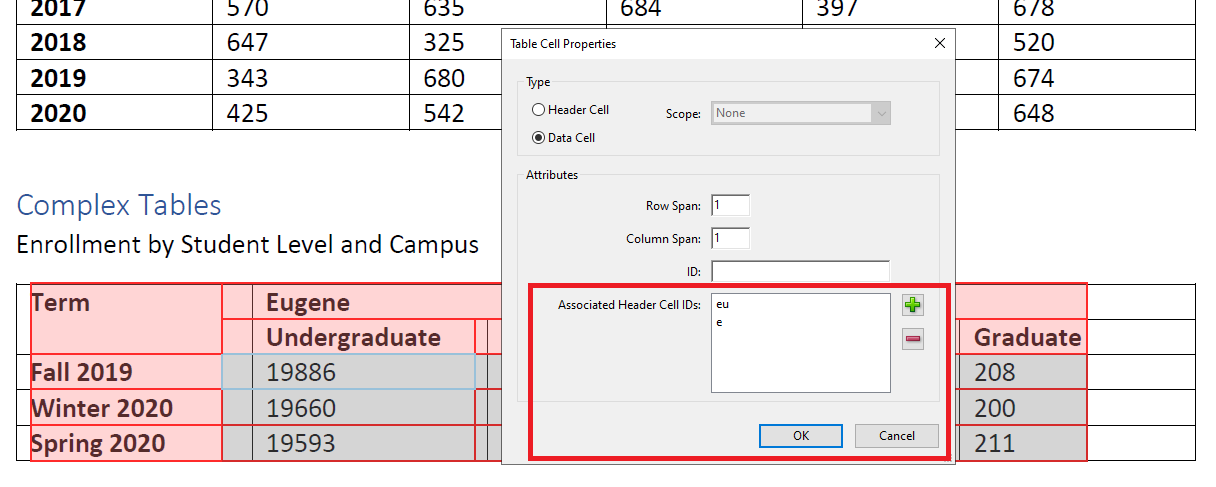
In the Associated Header Cell IDs box, click the green Plus icon, and you'll see a list of all the Header cell IDs you created previously. Select any Header IDs that apply to your data cell. In this screenshot, the very first data cell is selected, and it belongs to both the Eugene header, and the Undergraduate header nested under Eugene, so the 'e' and 'eu' Header Cell IDs are selected.
Do this for every single cell in the table.
If you only have complex headers in one direction on your table - only column header, or only row headers, you can multi-select. In this table, only the column headers are complex, so I can highlight entire columns of data cells at a time, and associate the complex headers all at once. I could grab all 3 Eugene Graduate data cells and give them Associated Header Cell IDs of 'e' and 'eg' at the same time. If you have complex column headers AND complex row headers in the same table, each and every cell will have a unique combination of Associated Header Cell IDs, meaning each and every cell in your entire table will need to be edited manually.
The sample table has 12 data cells. If you are working on a large table with hundreds of thousands of cells, this is hours and hours of rote work. Budget time accordingly when creating these PDFs, or better yet:
Avoid complex tables.